All Brands (Whirlpool, GE, Frigidaire, Electrolux, LG, Samsung, Kitchenaid, etc..) of Frost-Free Refrigerators and Freezers Have Defrost Systems.
Symptoms:
- Food in the freezer is soft and cold drinks in the refrigerator are no longer as cold as they have been.
- Adjusting temperature settings does not result in colder temperatures.
Confirming your refrigerator has a defrost system malfunction.
- The Defrost problem can be confirmed by removing food from the freezer.
- Remove the freezer interior panels that cover the cooling coils.
- A defrost problem is confirmed if the cooling coils are covered with ice. If there is no ice then the defrost system is working normally and you must look elsewhere for the source of your refrigerator malfunction. Call U-FIX-IT Appliance Parts for free diagnosis assistance.
- Ice acts as an insulator preventing the cooling coil from lowering the temperature in the freezer compartment to the desired setting.
- A hairdryer can be used to defrost the ice. Ice picks are a bad idea.
- The freezer (and refrigerator) will operate normally after the ice is removed.
- Normal operation will continue until the coils are again covered in ice which is usually about three days. Food can be protected by continuing to defrost manually as needed until the repair is made.
Three components of the defrost system.
- Defrost Heater
- Defrost termination switch (thermostat).
- Defrost timer or control board.
Purpose of Defrost System
The refrigerator and freezer doors will be opened and closed numerous times as family members store and retrieve food and drink. Every opening and closing of the doors allows air from the room to enter. Cold surfaces inside the freezer will cause moisture in the air to condense and form frost on the food items and cooling coils. Over time frost that is not removed will build up eventually forming solid ice. The defrost system prevents the buildup of frost and ice by periodically initiating the defrost cycle.
Defrost System Operation
- The defrost timer or control board initiates the defrost cycle.
- Mechanical timers initiate and terminate the cycle based on time.
- Control boards initiate and terminate the cycle utilizing combinations of time, logic, and temperature sensing.
- Timers and control boards are commonly located in the refrigerator section near the temperature controls behind plastic panels. Control boards may be mounted on the back of the refrigerator. Call U-FIX-IT Appliance Parts with your model number if you need help locating your board.
- The defrost cycle blocks power to the compressor and sends power to the defrost heater.
- Heaters are usually calrod heaters (look like small bake elements) or elements encased in a glass tube.
- Heaters will be fastened to the bottom of the cooling coils in the freezer section. High-end refrigerators with cooling coils in the refrigerator section will have a second defrost heater. Most refrigerators have one heater.
- The heat from the heater will melt the frost and ice on the cooling coil. The water (melted ice) runs down the cooling coils into a trough below the coils. Water collected in the trough is routed to a condensate pan located in the compressor section where it evaporates back out into the room from whence it came.
- The defrost termination switch (thermostat) or in some cases, a temperature sensor stops the heater from thawing the food in the freezer during the defrost cycle.
- Power is routed through the defrost termination switch (thermostat) to the heater.
- The defrost termination switch (thermostat) is mounted to the coil at the top.
- The defrost termination switch (thermostat) will cycle power to the heater off and on for the duration of the defrost cycle.
- As the heater raises the temperature of the defrost termination switch (thermostat) the power will cycle off to the heater.
- As the temperature of the defrost termination switch (thermostat) cools the power will be restored to the heater.
- Some defrost systems use a temperature sensor instead of the defrost termination switch (thermostat).
- Temperature sensors and heaters connect directly to the control board.
- Power to the heater is controlled by the control board.
The Quick Solution:
Repair technicians will usually replace all three components of the defrost system whenever it malfunctions. The symptoms are the same no matter which one of the three components fails and all three are the same age. Replacing all three eliminates the need to isolate which one of the three is bad.
Identifying Which One of the Three Defrost Components is Bad:
- Defrost heater is good if it has continuity between the leads and no continuity to ground.
- The defrost termination switch (thermostat) is good if it has continuity when cooled below 40 degrees.
- Temperature sensors can be tested by reading the resistance (ohms) at room temperature. Call U-FIX-IT with your model number for the ohm reading for your sensor.
- If the defrost heater and termination switch (thermostat) test “good” then the defrost control (timer or board) needs to be replaced.
- U-FIX-IT will test the heater and thermostat free of charge if you remove them and take them (along with a cup of ice) to your nearest U-FIX-IT Appliance Parts store.
It is a big deal when the air conditioning goes out on a hot summer day, but there is no need to wait for help to come to you. Many air conditioning malfunctions are not difficult to identify and repair. The following test procedure will help you identify if the problem with your outdoor unit is the fan motor, the capacitor, or the contactor.
Troubleshooting the “outdoor air conditioner unit not running” starts with some easy commonsense steps:
- Make certain the thermostat is set to cool and the indoor unit is running (blowing air out the room air vents).
- Listen to the outdoor unit for the sound of the compressor running.
- If you hear the compressor running go to “section A” below. Note, compressors can run quietly.
- If you cannot hear the compressor running go to “section B” below.
Scenario A:
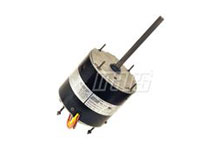
You can hear the a/c compressor running and the fan motor is not turning. Because the compressor is running you know there is 220 volts power to the outdoor unit and you know the contactor is doing its job of delivering that 220 volts to the compressor and to the motor. The malfunction will be a bad capacitor and/or a bad motor. Capacitors can be tested with multi-meters that have the ability to read microfarads or you can take your capacitor (and your motor) to your nearest U-FIX-IT store for a free bench test. If the capacitor tests good then your motor is bad.
Caution – Capacitors can store an electric charge (like a battery). The shock hazard is non-lethal, but it is no fun. Check the 220-volt power is off and discharge the capacitor by shorting between capacitor terminals (with an insulated screwdriver) before removing the wires from the terminals.
Interesting facts
- A capacitor connected to both the compressor and the motor can fail on just the motor side or just the compressor side.
- Bad a/c fan motors can sometimes be started by “spinning” the fan blade with a stick – it is still a bad motor.
- A capacitor that is “swollen” (a convex shape) on the side under the terminals is a bad capacitor.
- A dual capacitor powers both the compressor (HERM terminal) and the fan motor (FAN terminal). The third terminal is the common (C terminal).
Scenario B:
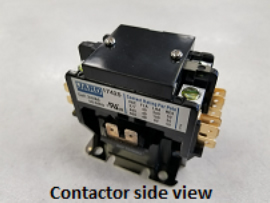
You cannot hear the a/c compressor running and the fan motor is not turning. Your next troubleshooting step will be checking the 220-volt power because it is highly unlikely both the compressor and the fan motor would fail at the same time. Failure of the contactor (see picture) is the electro-mechanical device that most often produces this symptom. This symptom can also be produced by a bad capacitor. You can prove the contactor or the capacitor is the problem by using a multi-meter or you can take your contactor to your nearest U-FIX-IT store for a free bench test.
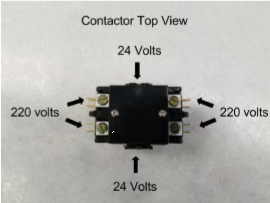
Testing the contactor on air conditioner outdoor unit
Using a multimeter, verify there are 220 volts going into the contactor, but zero volts coming out of the contactor (to the motor and compressor).
Check for 24 volts across the coil terminals.
The contactor is bad if multi-meter reads 220 volts going in, zero volts coming out, and 24 volts across the coil terminals.
Repair Tip: Before removing the wires from the contactor be certain power is turned off in two places. Electrical power should be turned off at the outdoor unit and the indoor furnace. The 24 volts controlling the contactor originates at the furnace. An accidental touching of the two wires together will burn up the transformer.
Testing the capacitor on the air conditioner outdoor unit
Visually inspect the capacitor for a bulging top below the terminals. It is likely the capacitor is bad if the terminal end is not flat.
A multimeter can be used to check for continuity between the terminals. A bad capacitor that is preventing both the motor and the compressor from starting will not have any continuity between the terminals. Note: a functioning capacitor will show a surge in the resistance and then return to zero (multimeter set to read resistance). Switch placement of the multimeter probes on the capacitor terminals and the “surge in resistance and return to zero will happen again. Some multimeter can read the microfarad rating of the capacitor. Replace the capacitor if it reads less than the rated mfd printed on the capacitor. Slightly higher is OK.

 Household Appliance Myth Busting
Urban myths are usually entertaining, but appliance myths are another story. These mechanical tales are passed around with the best intentions, but they aren’t based on facts, and some can be dangerous. If you buy into any one of these four household appliance myths, it’s time to bust them with a little common sense and these tips.
1. The Oven Can Heat the House
Leaving the oven on with the door open warms up the kitchen, but at a cost. With the door open the oven overheats causing the bake element or igniter to fail sooner. Wall ovens can be hard on the electronic controls and the cabinets as well. Your oven will last longer between repairs if you keep the oven door closed.
2. A Huge AC Keeps You Cooler
Even in Texas, bigger isn’t always better, but long, hot summers inspire homeowners to install over-sized air conditioners. This myth drives up cooling costs. Comfort is dependent on low humidity as much as a cooler temperature. The house cools down more quickly with a powerful AC, but that fast temperature drop results in short run times that are insufficient to lower the humidity resulting in a cold but clammy house.
3. Drip Pans Need Foil Linings
This myth probably started when someone got tired of cleaning the drip pans on their range. The stove top strategy is supposed to extend drip pan life, but the holes in those shallow, chrome bowls are designed to help ventilate the oven. New drip pans are inexpensive, so just replace them as needed. If you have a self-cleaning oven you can switch to ceramic drip pans which can be cleaned in the oven.
4. Less Use Means Longer Life
Appliances are meant for everyday use. If you think hand-washing pots and pans extends the dishwasher’s life, you’re wasting time in the sink. The seals around a dishwasher’s door are meant to perform in damp conditions, and the material dries out if you don’t run any loads for several weeks. Trust the mechanical muscle in your appliances, and let them flex on a regular basis.
We hope our myth-busting appliance tips save you from extra wear and tear, but we’re here with all the parts you need just in case. From heating elements to drip pans, U-Fix-It carries everything you need for DIY appliance repair at our four locations across the DFW area and here on our online shelves. When you need help fixing it yourself, you can count on us for the parts and the facts.
